Object
Oriented programming using java
What is Java
Java is a programming language and a platform.Java is a high
level, robust, secured and object-oriented programming language.Platform: Any
hardware or software environment in which a program runs, is known as a
platform. Since Java has its own runtime environment (JRE) and API, it is
called platform.
History of Java
Java history is interesting to know. The history of java starts from
Green Team. Java team members (also known as Green Team), initiated a
revolutionary task to develop a language for digital devices such as set-top
boxes, televisions etc.
For the green team members, it was
an advance concept at that time. But, it was suited for internet programming.
Later, Java technology as incorporated by Netscape.
Currently, Java is used in internet
programming, mobile devices, games, e-business solutions etc. There are given
the major points that describes the history of java.
1) James Gosling, Mike
Sheridan, and Patrick Naughton initiated the Java language project
in June 1991. The small team of sun engineers called Green Team.
2) Originally designed for small,
embedded systems in electronic appliances like set-top boxes.
3) Firstly, it was called "Greentalk"
by James Gosling and file extension was .gt.
4) After that, it was called Oak
and was developed as a part of the Green project.
Why
"Oak" name
5) Why Oak? Oak is a symbol
of strength and choosen as a national tree of many countries like U.S.A.,
France, Germany, Romania etc.
6) In 1995, Oak was renamed as "Java"
because it was already a trademark by Oak Technologies.
Java Version History
There are many java versions that
has been released. Current stable release of Java is Java SE 8.
JDK Alpha and Beta (1995)
JDK 1.0 (23rd Jan, 1996)
JDK 1.1 (19th Feb, 1997)
J2SE 1.2 (8th Dec, 1998)
J2SE 1.3 (8th May, 2000)
J2SE 1.4 (6th Feb, 2002)
J2SE 5.0 (30th Sep, 2004)
Java
SE 6 (11th Dec, 2006)
Java SE 7 (28th July, 2011)
Java SE 8 (18th March, 2014)
Features of Java
There is given many features of java. They are also known as java buzzwords. The Java Features given below are simple and easy to understand.- Simple
- Object-Oriented
- Portable
- Platform independent
- Secured
- Robust
- Architecture neutral
- Dynamic
- Interpreted
- High Performance
- Multithreaded
- Distributed
Simple
According to Sun, Java language is simple because:
|
syntax is based on C++
(so easier for programmers to learn it after C++).
|
removed many confusing
and/or rarely-used features e.g., explicit pointers, operator overloading
etc.
|
No need to remove
unreferenced objects because there is Automatic Garbage Collection in java.
|
Object-oriented
Object-oriented means we organize our software as a combination
of different types of objects that incorporates both data and behaviour.
|
Object-oriented programming(OOPs) is a methodology that
simplify software development and maintenance by providing some rules.
|
Basic concepts of OOPs are:
|
|
Platform Independent
A platform is the
hardware or software environment in which a program runs.
There are two types of platforms software-based and
hardware-based. Java provides software-based platform.
The Java platform differs from most other platforms in the
sense that it is a software-based platform that runs on the top of other
hardware-based platforms. It has two components:
1. Runtime
Environment
2. API(Application
Programming Interface)
Java code can be run on multiple platforms e.g. Windows,
Linux, Sun Solaris, Mac/OS etc. Java code is compiled by the compiler and
converted into bytecode. This bytecode is a platform-independent code because
it can be run on multiple platforms i.e. Write Once and Run Anywhere(WORA).
Secured
Java is secured because:
• No
explicit pointer
• Java
Programs run inside virtual machine sandbox
• Classloader: adds security by separating
the package for the classes of the local file system from those that are
imported from network sources.
• Bytecode
Verifier: checks the code fragments for illegal code that can violate access
right to objects.
• Security
Manager: determines what resources a class can access such as reading and
writing to the local disk.
These security are provided by java language. Some security
can also be provided by application developer through SSL, JAAS, Cryptography
etc.
Robust
Robust simply means strong. Java uses strong memory
management. There are lack of pointers that avoids security problem. There is
automatic garbage collection in java. There is exception handling and type
checking mechanism in java. All these points makes java robust.
Architecture-neutral
There is no implementation dependent features e.g. size of
primitive types is fixed.
In C programming, int data type occupies 2 bytes of memory
for 32-bit architecture and 4 bytes of memory for 64-bit architecture. But in
java, it occupies 4 bytes of memory for both 32 and 64 bit architectures.
Portable
We may carry the java bytecode to any platform.
High-performance
Java is faster than traditional interpretation since byte
code is "close" to native code still somewhat slower than a compiled
language (e.g., C++)
Distributed
We can create distributed applications in java. RMI and EJB
are used for creating distributed applications. We may access files by calling
the methods from any machine on the internet.
Multi-threaded
A thread is like a separate program, executing concurrently.
We can write Java programs that deal with many tasks at once by defining
multiple threads. The main advantage of multi-threading is that it doesn't
occupy memory for each thread. It shares a common memory area. Threads are
important for multi-media, Web applications etc.
Secured
Java is secured because:
• No
explicit pointer
• Java
Programs run inside virtual machine sandbox
• Classloader: adds security by separating
the package for the classes of the local file system from those that are
imported from network sources.
• Bytecode
Verifier: checks the code fragments for illegal code that can violate access
right to objects.
• Security
Manager: determines what resources a class can access such as reading and
writing to the local disk.
These security are provided by java language. Some security
can also be provided by application developer through SSL, JAAS, Cryptography
etc.
High-performance
Java is faster than traditional interpretation since byte
code is "close" to native code still somewhat slower than a compiled
language (e.g., C++)
Distributed
We can create distributed applications in java. RMI and EJB
are used for creating distributed applications. We may access files by calling
the methods from any machine on the internet.
Multi-threaded
A thread is like a separate program, executing concurrently.
We can write Java programs that deal with many tasks at once by defining
multiple threads. The main advantage of multi-threading is that it doesn't
occupy memory for each thread. It shares a common memory area. Threads are
important for multi-media, Web applications etc.
C++ vs Java
There are many differences and
similarities between C++ programming language and Java. A list of top
differences between C++ and Java are given below:
Comparison
Index
|
C++
|
Java
|
Platform-independent
|
C++ is platform-dependent.
|
Java is platform-independent.
|
Mainly used for
|
C++ is mainly used for system
programming.
|
Java is mainly used for
application programming. It is widely used in window, web-based, enterprise
and mobile applications.
|
Goto
|
C++ supports goto statement.
|
Java doesn't support goto
statement.
|
Multiple inheritance
|
C++ supports multiple inheritance.
|
Java doesn't support multiple
inheritance through class. It can be achieved by interfaces in java.
|
Operator Overloading
|
C++ supports operator overloading.
|
Java doesn't support operator
overloading.
|
Pointers
|
C++ supports pointers. You can
write pointer program in C++.
|
Java supports pointer internally.
But you can't write the pointer program in java. It means java has restricted
pointer support in java.
|
Compiler and Interpreter
|
C++ uses compiler only.
|
Java uses compiler and interpreter
both.
|
Call by Value and Call by
reference
|
C++ supports both call by value
and call by reference.
|
Java supports call by value only.
There is no call by reference in java.
|
Structure and Union
|
C++ supports structures and
unions.
|
Java doesn't support structures
and unions.
|
Thread Support
|
C++ doesn't have built-in support
for threads. It relies on third-party libraries for thread support.
|
Java has built-in thread support.
|
Documentation comment
|
C++ doesn't support documentation
comment.
|
Java supports documentation
comment (/** ... */) to create documentation for java source code.
|
Virtual Keyword
|
C++ supports virtual keyword so
that we can decide whether or not override a function.
|
Java has no virtual keyword. We
can override all non-static methods by default. In other words, non-static
methods are virtual by default.
|
unsigned right shift >>>
|
C++ doesn't support >>>
operator.
|
Java supports unsigned right shift
>>> operator that fills zero at the top for the negative numbers.
For positive numbers, it works same like >> operator.
|
Inheritance Tree
|
C++ creates a new inheritance tree
always.
|
Java uses single inheritance tree
always because all classes are the child of Object class in java. Object
class is the root of inheritance tree in java.
|
How to set path in Java
The path is required to be set for using tools such as javac, java etc.If you are saving the java source file inside the jdk/bin directory, path is not required to be set because all the tools will be available in the current directory.
But If you are having your java file outside the jdk/bin folder, it is necessary to set path of JDK.
There are 2 ways to set java path:
- temporary
- permanent
1) How to set Temporary Path of JDK in Windows
To set the temporary path of JDK, you need to follow following steps:- Open command prompt
- copy the path of jdk/bin directory
- write in command prompt: set path=copied_path
For Example:
set path=C:\Program Files\Java\jdk1.6.0\bin
What happens at compile time?
At compile time, java file is compiled by Java Compiler (It does not interact with OS) and converts the java code into bytecode.Understanding first java program
Let's see what is the meaning of
class, public, static, void, main, String[], System.out.println().
- class keyword is used to declare a class in java.
- public keyword is an access modifier which represents visibility, it means it is visible to all.
- static is a keyword, if we declare any method as static, it is known as static method. The core advantage of static method is that there is no need to create object to invoke the static method. The main method is executed by the JVM, so it doesn't require to create object to invoke the main method. So it saves memory.
- void is the return type of the method, it means it doesn't return any value.
- main represents startup of the program.
- String[] args is used for command line argument. We will learn it later.
- System.out.println() is used print statement. We will learn about the internal working of System.out.println statement later.
Ex: Creating hello java
example
Let's create the hello java program:- class Simple{
- public static void main(String args[]){
- System.out.println("Hello Java");
- }
- }
To compile:
|
javac Simple.java
|
To execute:
|
java Simple
|
Output:Hello Java
Variables and Data Types in Java
Variable is a name of memory location. There are three types of variables in java: local, instance and static.There are two types of data types in java: primitive and non-primitive.
Variable
Variable is name of reserved area allocated in memory. In other words, it is a name of memory location. It is a combination of "vary + able" that means its value can be changed.Types of Variable
There are three types of variables in java:- local variable
- instance variable
- static variable

1) Local Variable
A variable which is declared inside the method is called local variable.2) Instance Variable
A variable which is declared inside the class but outside the method, is called instance variable . It is not declared as static.3) Static variable
A variable that is declared as static is called static variable. It cannot be local.We will have detailed learning of these variables in next chapters.
Example to understand the types of variables in java
- class A{
- int data=50;//instance variable
- static int m=100;//static variable
- void method(){
- int n=90;//local variable
- }
- }//end of class
Data Types in Java
Data types represent the different values to be stored in the variable. In java, there are two types of data types:
- Primitive data types
- Non-primitive data types

-->Control Statements
-->Java If-else Statement
The Java if statement is used to test the condition. It
checks boolean condition: true or false. There are various types of if
statement in java.
if statement
if-else statement
nested if
statement
if-else-if ladder
(i)Java IF Statement
The Java if statement tests the condition. It executes the
if block if condition is true.
Syntax:
if(condition){
//code to be
executed
}
if statement in java


Example:
public class
IfExample {
public static void
main(String[] args) {
int
age=20;
if(age>18){
System.out.print("Age is greater than 18");
}
}
}
Output:
Age is greater than 18
(ii)Java IF-else Statement
The Java if-else statement also tests the condition. It
executes the if block if condition is true otherwise else block is executed.
Syntax:
if(condition){
//code if
condition is true
}else{
//code if
condition is false
}
if-else statement in java


Example:
public class
IfElseExample {
public static void
main(String[] args) {
int
number=13;
if(number%2==0){
System.out.println("even number");
}else{
System.out.println("odd number");
}
}
}
Output:
odd number
(iii)Java IF-else-if ladder Statement
The if-else-if ladder statement executes one condition from
multiple statements.
Syntax:
if(condition1){
//code to be
executed if condition1 is true
}else
if(condition2){
//code to be
executed if condition2 is true
}
else
if(condition3){
//code to be
executed if condition3 is true
}
...
else{
//code to be
executed if all the conditions are false
}
if-else-if ladder statement in java

Example:
public class
IfElseIfExample {
public static void
main(String[] args) {
int
marks=65;
if(marks<50){
System.out.println("fail");
}
else
if(marks>=50 && marks<60){
System.out.println("D grade");
}
else
if(marks>=60 && marks<70){
System.out.println("C grade");
}
else if(marks>=70 &&
marks<80){
System.out.println("B grade");
}
else
if(marks>=80 && marks<90){
System.out.println("A grade");
}else
if(marks>=90 && marks<100){
System.out.println("A+ grade");
}else{
System.out.println("Invalid!");
}
}
}
Output:
C grade
Java Switch Statement
The Java switch statement executes one statement from multiple conditions. It is like if-else-if ladder statement.Syntax:
switch(expression){
case value1:
//code to be executed;
break; //optional
case value2:
//code to be executed;
break; //optional
......
default:
code to be executed if all cases are not matched;
}
case value1:
//code to be executed;
break; //optional
case value2:
//code to be executed;
break; //optional
......
default:
code to be executed if all cases are not matched;
}
Example:
public class Test {

   public static void main(String args[]) {
      // char grade = args[0].charAt(0);
      char grade = 'C';

      switch(grade) {
         case 'A' :
            System.out.println("Excellent!");
            break;
         case 'B' :
         case 'C' :
            System.out.println("Well done");
            break;
         case 'D' :
            System.out.println("pass");
         case 'F' :
            System.out.println("Better try again");
            break;
         default :
            System.out.println("Invalid grade");
      }
      System.out.println("Your grade is " + grade);
   }
}
-->Java Break Statement
The Java break is used to break loop or switch statement. It
breaks the current flow of the program at specified condition. In case of inner
loop, it breaks only inner loop.
Syntax:
jump-statement;
break;

Java Break Statement with Loop
Example:
public static void main(String[] args) {
for(int i=1;i<=10;i++){
if(i==5){
break;
}
System.out.println(i);
}
}
}
Output:
1
2
3
4
Java
Break Statement with Inner Loop
It breaks inner loop only if you use
break statement inside the inner loop.
Example:
public static void main(String[] args) {
for(int i=1;i<=3;i++){
for(int j=1;j<=3;j++){
if(i==2&&j==2){
break;
}
System.out.println(i+" "+j);
}
}
}
}
Output:
1
1
1
2
1
3
2
1
3
1
3
2
3
3
Java Continue Statement
The Java continue statement is used to continue loop. It continues the current flow of the program and skips the remaining code at specified condition. In case of inner loop, it continues only inner loop.Syntax:
- jump-statement;
- continue;
Java Continue Statement Example
Example:public static void main(String[] args) {
for(int i=1;i<=10;i++){
if(i==5){
continue;
}
System.out.println(i);
}
}
}
1
2
3
4
6
7
8
9
10
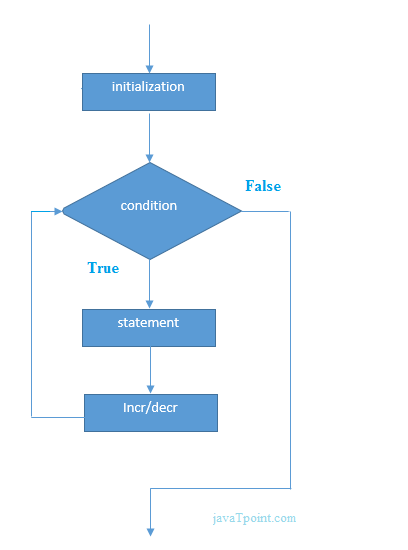
Java Simple For Loop
The simple for loop is same as C/C++. We can initialize variable, check condition and increment/decrement value.Syntax:
- for(initialization;condition;incr/decr){
- //code to be executed
- }
 Example:
public static void main(String[] args) {
for(int i=1;i<=10;i++){
System.out.println(i);
}
}
}
1
2
3
4
5
6
7
8
9
10
Example2:
Print the list of Even numbers
public class ListEvenNumbers {
public static void main(String[] args) {
//define limit
int limit = 50;
System.out.println("Printing Even numbers between 1 and " + limit);
for(int i=1; i <= limit; i++){
// if the number is divisible by 2 then it is even
if( i % 2 == 0){
System.out.print(i + " ");
}
}
}
}
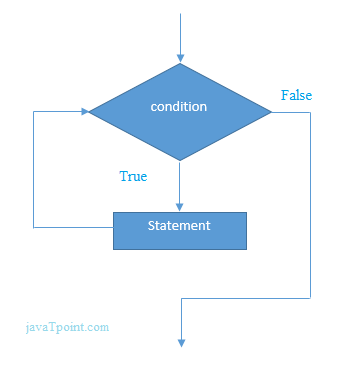
Java While Loop
Syntax:
- while(condition){
- //code to be executed
- }
 Example:
public static void main(String[] args) {
int i=1;
while(i<=10){
System.out.println(i);
i++;
}
}
}
1
2
3
4
5
6
7
8
9
10
Ex2:
Write a program of Reverse number
class ReverseNumberDemo
{
   public static void main(String args[])
   {
      int num=123456789;
      int reversenum =0;
      while( num != 0 )
      {
          reversenum = reversenum * 10;
          reversenum = reversenum + num%10;
          num = num/10;
      }

      System.out.println("Reverse of specified number is: "+reversenum);
   }
}
A do...while loop is similar to a while loop, except that a do...whileDo-while
loop is guaranteed to execute at least one time.Syntaxdo {// Statements}while(Boolean_expression);Notice that the Boolean expression appears at the end of the loop, so the statements in the loop execute once before the Boolean is tested.If the Boolean expression is true, the control jumps back up to do statement, and the statements in the loop execute again. This process repeats until the Boolean expression is false.public class Test {public static void main(String args[]) {int x = 10;do {System.out.print("value of x : " + x );x++;System.out.print("\n");}while( x < 20 );}}

Java String
In java, string is basically an object that represents sequence of char values. An array of characters works same as java string. For example:
- char[] ch={'j','a','v','a','t','p','o','i','n','t'};
- String s=new String(ch);
- String s="javatpoint";
The java String is immutable i.e. it cannot be changed. Whenever we change any string, a new instance is created. For mutable string, you can use StringBuffer and StringBuilder classes.
public static void main(String args[]){
String s1="java";//creating string by java string literal
char ch[]={'s','t','r','i','n','g','s'};
String s2=new String(ch);//converting char array to string
String s3=new String("example");//creating java string by new keyword
System.out.println(s1);
System.out.println(s2);
System.out.println(s3);
}}
Java Array
Normally, array is a collection of similar type of elements that have contiguous memory location.Java array is an object the contains elements of similar data type. It is a data structure where we store similar elements. We can store only fixed set of elements in a java array.
Array in java is index based, first element of the array is stored at 0 index.
Advantage of Java Array
- Code Optimization: It makes the code optimized, we can retrieve or sort the data easily.
- Random access: We can get any data located at any index position.
Disadvantage of Java Array
Size Limit: We can store only fixed size of elements in the array. It doesn't grow its size at runtime.Types of Array in java
There are two types of array.- Single Dimensional Array
- Multidimensional Array
Single Dimensional Array
Syntax to Declare an Array in java
- dataType[] arr; (or)
- dataType []arr; (or)
- dataType arr[];
Instantiation of an Array in java
- arrayRefVar=new datatype[size];
Example
class Testarray{public static void main(String args[]){
int a[]=new int[5];//declaration and instantiation
a[0]=10;//initialization
a[1]=20;
a[2]=70;
a[3]=40;
a[4]=50;
//printing array
for(int i=0;i<a.length;i++)//length is the property of array
System.out.println(a[i]);
}}
We can declare, instantiate and initialize the java array together by:
int a[]={33,3,4,5};//declaration, instantiation and initialization
Example
class Testarray1{public static void main(String args[]){
int a[]={33,3,4,5};//declaration, instantiation and initialization
//printing array
for(int i=0;i<a.length;i++)//length is the property of array
System.out.println(a[i]);
}}
Multidimensional array in java
In such case, data is stored in row and column based index (also known as matrix form).Syntax to Declare Multidimensional Array in java
- dataType[][] arrayRefVar; (or)
- dataType [][]arrayRefVar; (or)
- dataType arrayRefVar[][]; (or)
- dataType []arrayRefVar[];
Example to instantiate Multidimensional Array in java
int[][] arr=new int[3][3];/
class Testarray3{
public static void main(String args[]){
//declaring and initializing 2D array
int arr[][]={{1,2,3},{2,4,5},{4,4,5}};
//printing 2D array
for(int i=0;i<3;i++){
for(int j=0;j<3;j++){
System.out.print(arr[i][j]+" ");
}
System.out.println();
}
}}
Test it Now
class twod
{
public static void main(String args[])
{
int n,m,i,j;
Scanner sc=new Scanner(System.in);
System.out.println("Enter the number of rows");
n=sc.nextInt();
System.out.println("Enter the number of rows");
m=sc.nextInt();
int a[][]=new int[n][m];
int b[][]=new int[n][m];
System.out.println("Enter the elements of first matrix");
for( i=0;i<n;i++)
for( j=0;j<m;j++)
a[i][j]=sc.nextInt();
System.out.println("Enter the elements of second matrix");
for( i=0;i<n;i++)
for( j=0;j<m;j++)
b[i][j]=sc.nextInt();
int c[][]=new int[n][m];
for( i=0;i<n;i++)
for( j=0;j<m;j++)
c[i][j]=a[i][j]+b[i][j];
System.out.println("addition of two matrices is");
for(i=0;i<n;i++)
{
for(j=0;j<m;j++)
System.out.print(c[i][j] + " \t");
System.out.println();
}
}
}
class Main
{
public static void main(String[] args)
{
// Declaring 2-D array with 2 rows
int arr[][] = new int[2][];
// Making the above array Jagged
// First row has 3 columns
arr[0] = new int[3];
// Second row has 2 columns
arr[1] = new int[2];
// Initializing array
int count = 0;
for (int i=0; i<arr.length; i++)
for(int j=0; j<arr[i].length; j++)
arr[i][j] = count++;
// Displaying the values of 2D Jagged array
System.out.println("Contents of 2D Jagged Array");
for (int i=0; i<arr.length; i++)
{
for (int j=0; j<arr[i].length; j++)
System.out.print(arr[i][j] + " ");
System.out.println();
}
}
}
Syntax:
Polymorphism in Java are mainly of 2 types:
1.Overloading
In java, we use abstract class and interface to achieve abstraction.
int id;
String name;
}
class TestStudent2{
public static void main(String args[]){
Student s1=new Student();
s1.id=101;
s1.name="Sonoo";
System.out.println(s1.id+" "+s1.name);//printing members with a white space
}
}
int id;
String name;
}
class TestStudent3{
public static void main(String args[]){
//Creating objects
Student s1=new Student();
Student s2=new Student();
//Initializing objects
s1.id=101;
s1.name="Sonoo";
s2.id=102;
s2.name="Amit";
//Printing data
System.out.println(s1.id+" "+s1.name);
System.out.println(s2.id+" "+s2.name);
}
}
public static void main(String args[]){
//declaring and initializing 2D array
int arr[][]={{1,2,3},{2,4,5},{4,4,5}};
//printing 2D array
for(int i=0;i<3;i++){
for(int j=0;j<3;j++){
System.out.print(arr[i][j]+" ");
}
System.out.println();
}
}}
Test it Now
Output:1 2 3
       2 4 5
       4 4 5
Addition of two matrices
import java.util.*;class twod
{
public static void main(String args[])
{
int n,m,i,j;
Scanner sc=new Scanner(System.in);
System.out.println("Enter the number of rows");
n=sc.nextInt();
System.out.println("Enter the number of rows");
m=sc.nextInt();
int a[][]=new int[n][m];
int b[][]=new int[n][m];
System.out.println("Enter the elements of first matrix");
for( i=0;i<n;i++)
for( j=0;j<m;j++)
a[i][j]=sc.nextInt();
System.out.println("Enter the elements of second matrix");
for( i=0;i<n;i++)
for( j=0;j<m;j++)
b[i][j]=sc.nextInt();
int c[][]=new int[n][m];
for( i=0;i<n;i++)
for( j=0;j<m;j++)
c[i][j]=a[i][j]+b[i][j];
System.out.println("addition of two matrices is");
for(i=0;i<n;i++)
{
for(j=0;j<m;j++)
System.out.print(c[i][j] + " \t");
System.out.println();
}
}
}
Jagged Arrays
Jagged array is array of arrays such that member arrays can be of different sizes, i.e., we can create a 2-D arrays but with variable number of columns in each row.
{
public static void main(String[] args)
{
// Declaring 2-D array with 2 rows
int arr[][] = new int[2][];
// Making the above array Jagged
// First row has 3 columns
arr[0] = new int[3];
// Second row has 2 columns
arr[1] = new int[2];
// Initializing array
int count = 0;
for (int i=0; i<arr.length; i++)
for(int j=0; j<arr[i].length; j++)
arr[i][j] = count++;
// Displaying the values of 2D Jagged array
System.out.println("Contents of 2D Jagged Array");
for (int i=0; i<arr.length; i++)
{
for (int j=0; j<arr[i].length; j++)
System.out.print(arr[i][j] + " ");
System.out.println();
}
}
}
Java Scanner class
There are various ways to read input from the keyboard, the java.util.Scanner class is one of them.
Syntax:
Scanner sc=new Scanner(Sytem.in);
class ScannerTest{
public static void main(String args[]){
Scanner sc=new Scanner(System.in);
System.out.println("Enter your rollno");
int rollno=sc.nextInt();
System.out.println("Enter your name");
String name=sc.next();
System.out.println("Enter your fee");
double fee=sc.nextDouble();
System.out.println("Rollno:"+rollno+" name:"+name+" fee:"+fee);
sc.close();
}
}
Commonly used methods of Scanner class
There is a list of commonly used Scanner class methods:| Method | Description | |||||
|---|---|---|---|---|---|---|
| public String next() | it returns the next token from the scanner. | |||||
| public String nextLine() | it moves the scanner position to the next line and returns the value as a string. | |||||
| public byte nextByte() | it scans the next token as a byte. | |||||
| public short nextShort() | it scans the next token as a short value. | |||||
| public int nextInt() | it scans the next token as an int value. | |||||
| public long nextLong() | it scans the next token as a long value. | |||||
| public float nextFloat() | it scans the next token as a float value. | |||||
| public double nextDouble() | it scans the next token as a double value |
Example
import java.util.Scanner;class ScannerTest{
public static void main(String args[]){
Scanner sc=new Scanner(System.in);
System.out.println("Enter your rollno");
int rollno=sc.nextInt();
System.out.println("Enter your name");
String name=sc.next();
System.out.println("Enter your fee");
double fee=sc.nextDouble();
System.out.println("Rollno:"+rollno+" name:"+name+" fee:"+fee);
sc.close();
}
}
Output:
Object means a real word entity such as pen, chair, table etc. Object-Oriented Programming is a methodology or paradigm to design a program using classes and objects. It simplifies the software development and maintenance by providing some concepts:
A class in Java can contain:
An object has three characteristics:

Inheritance is an important pillar of OOP(Object Oriented Programming). It is the mechanism in java by which one class is allow to inherit the features(fields and methods) of another class.
Important terminology:
       Enter your rollno
       111
       Enter your name
       Ratan
       Enter
       450000
       Rollno:111 name:Ratan fee:450000
OOPs (Object Oriented Programming System)
Object means a real word entity such as pen, chair, table etc. Object-Oriented Programming is a methodology or paradigm to design a program using classes and objects. It simplifies the software development and maintenance by providing some concepts:
- Object
- Class
- Inheritance
- Polymorphism
- Abstraction
- Encapsulation
class
Class is user defined datatype.It contains both datamembers and member fuctions under a single entity
A class is a group of objects which have common properties. It is a
template or blueprint from which objects are created. It is a logical
entity. It can't be physical.A class in Java can contain:
- fields
- methods
- constructors
- blocks
- nested class and interface
Syntax to declare a class:
- class <class_name>{
- field;
- method;
- }
Object
Any entity that has state and behavior is known as an object. For example: chair, pen, table, keyboard, bike etc. It can be physical and logical.An object has three characteristics:
- state: represents data (value) of an object.
- behavior: represents the behavior (functionality) of an object such as deposit, withdraw etc.
- identity: Object identity is typically implemented via a unique ID. The value of the ID is not visible to the external user. But, it is used internally by the JVM to identify each object uniquely.

Inheritance
When one object acquires all the properties and behaviours of parent object i.e. known as inheritance. It provides code reusability. It is used to achieve runtime polymorphism.Inheritance is an important pillar of OOP(Object Oriented Programming). It is the mechanism in java by which one class is allow to inherit the features(fields and methods) of another class.
Important terminology:
- Super Class: The class whose features are inherited is known as superclass(or a base class or a parent class).
- Sub Class: The class that inherits the other class is known as subclass(or a derived class, extended class, or child class). The subclass can add its own fields and methods in addition to the superclass fields and methods.
- Reusability: Inheritance supports the concept of “reusability”, i.e. when we want to create a new class and there is already a class that includes some of the code that we want, we can derive our new class from the existing class. By doing this, we are reusing the fields and methods of the existing class.
Syntax:
class derived-class extends base-class
{
   //methods and fields
}
Polymorphism
Polymorphism refers to the ability of OOPs programming languages to differentiate between entities with the same name efficiently. This is done by Java with the help of the signature and declaration of these entities.Polymorphism in Java are mainly of 2 types:
1.Overloading
2. Overriding
Example for Polymorphism
public class Sum { // Overloaded sum(). // This sum takes two int parameters public int sum(int x, int y) { return (x + y); } // Overloaded sum(). // This sum takes three int parameters public int sum(int x, int y, int z) { return (x + y + z); } // Overloaded sum(). // This sum takes two double parameters public double sum(double x, double y) { return (x + y); } public static void main(String args[]) { Sum s = new Sum(); System.out.println(s.sum(10, 20)); System.out.println(s.sum(10, 20, 30)); System.out.println(s.sum(10.5, 20.5)); } } Abstraction
Hiding internal details and showing functionality is known as abstraction. For example: phone call, we don't know the internal processing.In java, we use abstract class and interface to achieve abstraction.
Encapsulation
Binding (or wrapping) code and data together into a single unit is known as encapsulation. For example: capsule, it is wrapped with different medicinesExample
class Student{int id;
String name;
}
class TestStudent2{
public static void main(String args[]){
Student s1=new Student();
s1.id=101;
s1.name="Sonoo";
System.out.println(s1.id+" "+s1.name);//printing members with a white space
}
}
-->Method
A method is a collection of statements that perform some specific task
and return result to the caller. A method can perform some specific task
without returning anything. Methods allow us to reuse
the code without retyping the code. In Java, every method must be part
of some class which is different from languages like C, C++ and Python.
Methods are time savers and help us to reuse the code without retyping the code.
Method Declaration
In general, method declarations has six components:- Access Modifiers: Defines access type of the method i.e. from where it can be accessed in your application. In Java, there 4 type of the access specifiers.
- public: accessible in all class in your application.
- protected: accessible within the package in which it is defined and in its subclass(es)(including subclasses declared outside the package)
- private: accessible only within the class in which it is defined.
- default (declared/defined without using any modifier): accessible within same class and package within which its class is defined.
- The return type: The data type of the value returned by the the method or void if does not return a value.
- Method Name: the rules for field names apply to method names as well, but the convention is a little different.
- Parameter list: Comma separated list of the input parameters are defined, preceded with their data type, within the enclosed parenthesis. If there are no parameters, you must use empty parentheses ().
- Exception list: The exceptions you expect by the method can throw, you can specify these exception(s).
- Method body: it is enclosed between braces. The code you need to be executed to perform your intended operations.

We can also create multiple objects and store information in it through reference variable.
class Student{int id;
String name;
}
class TestStudent3{
public static void main(String args[]){
//Creating objects
Student s1=new Student();
Student s2=new Student();
//Initializing objects
s1.id=101;
s1.name="Sonoo";
s2.id=102;
s2.name="Amit";
//Printing data
System.out.println(s1.id+" "+s1.name);
System.out.println(s2.id+" "+s2.name);
}
}
//Passing parameters to methods
class stud
{
int studno;
String sname;
void insertdata(int sno,String name)
{
studno=sno;
sname=name;
}
void display()
{
System.out.println("the student no is" +studno);
System.out.println("the student nmae is" +sname);
}
}
class s1
{
public static void main(String[] args)
{
// System.out.println("Hello World!");
stud s=new stud();
s.insertdata(6,"sunitha");
s.display();
}
}
If you have to use an object only once, anonymous object is a good approach. For example:
Calling method through anonymous object
Let's see the full example of anonymous object in java.
Output:
int acc_no;
String name;
float amount;
void insert(int a,String n,float amt){
acc_no=a;
name=n;
amount=amt;
}
Typically, you will use a constructor to give initial values to the instance variables defined by the class, or to perform any other start-up procedures required to create a fully formed object.
1. Use of super with variables: This scenario occurs when a derived class and base class has same data members.
2. Use of super with methods: This is used when we want to call parent class method. So whenever a parent and child class have same named methods
interface myinterface
{
int no=10; //static and final variable
String name="sunitha";// static and final variable
void run();//abstract method
}
interface d1
Simply, abstract class achieves partial abstraction (0 to 100%) whereas interface achieves fully abstraction (100%).
Multi -Threading
Advantages of Java Multithreading
1) It doesn't block the user because threads are independent and you can perform multiple operations at same time.
Commonly used Constructors of Thread class:
There are many java daemon threads running automatically e.g. gc, finalizer etc.
Program
INTERTHREAD COMMUNICATION
Java provide benefits of avoiding thread pooling using inter-thread communication.
The wait(), notify(), and notifyAll() methods of Object class are used for this purpose.
These method are implemented as final methods in Object,so that all classes have them.
All the three method can be called only from within a synchronized context.
(i)wait() tells calling thread to give up monitor
and go to sleep until some other thread
enters the same monitor and call notify.
(ii)notify() wakes up a thread that
called wait() on same object.
(iii)notifyAll() wakes up all the thread that called wait()
on same object.
class Pen{}
class Paper{}
public class Write {
public static void main(String[] args)
{
final Pen pn =new Pen();
final Paper pr =new Paper();
Thread t1 = new Thread(){
public void run()
{
synchronized(pn)
{
System.out.println("Thread1 is holding Pen");
try{
Thread.sleep(1000);
}catch(InterruptedException e){}
synchronized(pr)
{ System.out.println("Requesting for Paper"); }
}
}
};
Thread t2 = new Thread(){
public void run()
{
synchronized(pr)
{
System.out.println("Thread2 is holding Paper");
try{
Thread.sleep(1000);
}catch(InterruptedException e){}
synchronized(pn)
{ System.out.println("requesting for Pen"); }
}
}
};
t1.start();
t2.start();
}
}
Commonly used methods of Graphics class:
(i)public abstract void drawString(String str, int x, int y)
is used to draw the specified string.
(ii)public void drawRect(int x, int y, int width, int height)
draws a rectangle with the specified width and height.
(iii)public abstract void fillRect(int x, int y, int width, int height)
is used to fill rectangle with the default color and specified width and height.
(iv)public abstract void drawOval(int x, int y, int width, int height)
is used to draw oval with the specified width and height.
(v)public abstract void fillOval(int x, int y, int width, int height)
is used to fill oval with the default color and specified width and height.
(vi)public abstract void drawLine(int x1, int y1, int x2, int y2)
is used to draw line between the points(x1, y1) and (x2, y2).
(vii)public abstract void drawArc(int x,int y,int width,int height,int startAngle, int arcAngle)
is used draw a circular or elliptical arc.
(viii)public abstract void fillArc(int x, int y, int width, int height, int startAngle, int arcAngle)
is used to fill a circular or elliptical arc.
(ix)public abstract void setColor(Color c)
is used to set the graphics current color to the specified color.
(x) public abstract void setFont(Font font)
is used to set the graphics current font to the specified font.
import java.applet.*;
import java.awt.*;
public class Shapes extends Applet {
int x = 300, y = 100, r = 50;
public void paint(Graphics g) {
g.drawLine(30,300,200,10);
g.drawOval(x-r,y-r,100,100);
g.drawRect(400,50,200,100);
}
}
/*<applet code="Shapes.class" width=300 height=300>
</applet>*/
import java.applet.*;
import java.awt.*;
public class fillColor extends Applet
{
public void paint(Graphics g)
{
g.drawRect(300,150,200,100);
g.setColor(Color.green);
g.fillRect( 300,150, 200, 100 );
g.setColor(Color.magenta);
g.drawString("Rectangle",500,150);
}
}
/*<applet code="fillColor.class" width=300 height=300>
</applet>*/
import java.awt.*;
public class GraphicsDemo extends Applet{
public void paint(Graphics g){
g.setColor(Color.blue);
g.drawString("Welcome",50, 50);
g.drawLine(20,30,20,300);
g.drawRect(70,100,30,30);
g.fillRect(170,100,30,30);
g.drawOval(70,200,30,30);
g.setColor(Color.red);
g.fillOval(170,200,30,30);
g.drawArc(90,150,30,30,30,270);
g.fillArc(270,150,30,30,0,180);
}
}
/* <applet code="GraphicsDemo.class" width="300" height="300">
</applet> */
import java.awt.*;
import java.util.Date;
public class GFG extends Applet
{
public void paint(Graphics g)
{
Date dt = new Date();
super.showStatus("Today is" + dt);
}
}
/*<applet code="GFG.class" width=300 height=300>
</applet>*/
For example, clicking on a button, moving the mouse, entering a character through keyboard,selecting an item from list, scrolling the page are the activities that causes an event to happen
1. Event Sources
2. Event classes
3. Event Listeners
4. Event Adapters
1. Event Sources
Event sources are components, subclasses of java.awt.Component, capable to generate events. The event source can be a button, TextField or a Frame etc.
2. Event classes
Almost every event source generates an event and is named by some Java class. For example, the event generated by button is known as ActionEvent and that of Checkbox is known as ItemEvent. All the events are listed in java.awt.event package. Following list gives a few components and their corresponding listeners.
The events generated by the GUI components are handled by a special group of interfaces known as "listeners". Note, Listener is an interface. Every component has its own listener, say, AdjustmentListener handles the events of scrollbar Some listeners handle the events of multiple components. For example, ActionListener handles the events of Button, TextField, List and Menus. Listeners are from java.awt.event package.
More description on listeners and list of listeners is available at Java AWT Listeners.
4. Event Adapters
When a listener includes many abstract methods to override, the coding becomes heavy to the programmer. For example, to close the frame, you override seven abstract methods of WindowListener, in which, infact you are using only one method. To avoid this heavy coding, the designers come with another group of classes known as "adapters". Adapters are abstract classes defined in java.awt.event package. Every listener that has more than one abstract method has got a corresponding adapter class.
More description on adapters and list of adapters is available at Java AWT Adapters.
An action event occurs, whenever an action is performed by the user. Examples: When the user clicks a button, chooses a menu item, presses Enter in a text field. The result is that an
To write an Action Listener, follow the steps given below:

AWT stands for Abstract Window Toolkit. It is a toolkit of classes with which a programmer can develop Graphics and Graphical User Interface components. AWT gives a front-end technology to Java using which a user can interact with a running process;
These two are very big packages and contains lot of classes doing different
functionalities. To study these classes, the whole tutorial can be divided into
the following topics.
class
MyButtonListener implements

Unlike AWT, Java Swing provides platform-independent and lightweight components.
The javax.swing package provides classes for java swing API such as JButton, JTextField, JTextArea, JRadioButton, JCheckbox, JMenu, JColorChooser etc.
JWindow : This is Swing's version of Window and has descended directly from Window class. Like Window it uses BorderLayout by default.
JPanel : JPanel is Swing's version of AWT class Panel and uses the same default layout, FlowLayout. JPanel is descended directly from JComponent.
JFrame : JFrame is Swing's version of Frame and is descended directly from Frame class. The component which is added to the Frame, is refered as its Content.
Creating a JFrame
There are two ways to create a JFrame Window.
(i) By instantiating JFrame class.
(ii) By extending JFrame class.
(i) Example program By instantiating JFrame class.
MVC Pattern stands for Model-View-Controller Pattern. This pattern is used to separate application's concerns.
Servlet was considered superior to CGI. Servlet technology doesn't create process, rather it creates thread to handle request. The advantage of creating thread over process is that it doesn't allocate separate memory area. Thus many subsequent requests can be easily handled by servlet.
Problem in Servlet technology Servlet needs to recompile if any designing code is modified. It doesn't provide separation of concern. Presentation and Business logic are mixed up.
JSP overcomes almost all the problems of Servlet. It provides better separation of concern, now presentation and business logic can be easily separated. You don't need to redeploy the application if JSP page is modified. JSP provides support to develop web application using JavaBean.

flow of the model1 architecture.
Model The model represents the state (data) and business logic of the application.
View The view module is responsible to display data i.e. it represents the presentation.
Controller The controller module acts as an interface between view and model. It intercepts all the requests i.e. receives input and commands to Model / View to change accordingly.

Advantage of Model 2 (MVC) Architecture
File is nothing but collection of records related to DBMS
In programming language, file concept is an approach in
storing data in a secondary memory in the form of file
Operations on files
1. Read op
2. write op
3. Append op
4. Read/Write OP
In java file concept is using Stream Readers
FileInputStream reader
FileOutputStream reader
FileInputStream reader:
we can read the data from a file and display it on the console, If file exist
FileOutputStream reader:
using this we create a new file and store data on to a file, which is entered from the keyboard
class crateFile
{
public static void main(String args[])throws IOException
{
DataInputStream dis=new DataInputStream(System.in);
FileOutputStream fout=new FileOutputStream("h2.txt");
System.out.println("Enter text @ at the end");
char ch;
while((ch=(char)dis.read())!='@')
fout.write(ch);
fout.close();
}
}
import java.io.*;
class readfile
{
public static void main(String[] args) throws IOException
{
int ch;
FileReader fr=null;
try
{
fr=new FileReader("h1.txt");
}
catch (FileNotFoundException fe)
{
System.out.println("File not found");
return;
}
while ((ch=fr.read())!=-1)
System.out.print((char)ch);
fr.close();
}
}
{
int studno;
String sname;
void insertdata(int sno,String name)
{
studno=sno;
sname=name;
}
void display()
{
System.out.println("the student no is" +studno);
System.out.println("the student nmae is" +sname);
}
}
class s1
{
public static void main(String[] args)
{
// System.out.println("Hello World!");
stud s=new stud();
s.insertdata(6,"sunitha");
s.display();
}
}
Anonymous object
Anonymous simply means nameless. An object which has no reference is known as anonymous object. It can be used at the time of object creation only.If you have to use an object only once, anonymous object is a good approach. For example:
- new Calculation();//anonymous object
Calling method through reference:
- Calculation c=new Calculation();
- c.fact(5);
- new Calculation().fact(5);
- class Calculation{
- void fact(int n){
- int fact=1;
- for(int i=1;i<=n;i++){
- fact=fact*i;
- }
- System.out.println("factorial is "+fact);
- }
- public static void main(String args[]){
- new Calculation().fact(5);//calling method with anonymous object
- }
- }
Factorial is 120
Example:
class Account{int acc_no;
String name;
float amount;
void insert(int a,String n,float amt){
acc_no=a;
name=n;
amount=amt;
}
void deposit(float amt){
amount=amount+amt;
System.out.println(amt+" deposited");
}
amount=amount+amt;
System.out.println(amt+" deposited");
}
void withdraw(float amt){
if(amount<amt){
System.out.println("Insufficient Balance");
}else{
amount=amount-amt;
System.out.println(amt+" withdrawn");
}
}
if(amount<amt){
System.out.println("Insufficient Balance");
}else{
amount=amount-amt;
System.out.println(amt+" withdrawn");
}
}
void checkBalance(){System.out.println("Balance is: "+amount);}
void display(){System.out.println(acc_no+" "+name+" "+amount);}
}
class TestAccount{
public static void main(String[] args){
Account a1=new Account();
a1.insert(832345,"Ankit",1000);
a1.display();
a1.checkBalance();
a1.deposit(40000);
a1.checkBalance();
a1.withdraw(15000);
a1.checkBalance();
}}
void display(){System.out.println(acc_no+" "+name+" "+amount);}
}
class TestAccount{
public static void main(String[] args){
Account a1=new Account();
a1.insert(832345,"Ankit",1000);
a1.display();
a1.checkBalance();
a1.deposit(40000);
a1.checkBalance();
a1.withdraw(15000);
a1.checkBalance();
}}
Constructors
A constructor initializes an object when it is created. It has the same name as its class and is syntactically similar to a method. However, constructors have no explicit return type.Typically, you will use a constructor to give initial values to the instance variables defined by the class, or to perform any other start-up procedures required to create a fully formed object.
Syntax
Following is the syntax of a constructor −class ClassName { ClassName() { } }
Types of Java constructors
There are two types of constructors in Java:- Default constructor (no-arg constructor)
- Parameterized constructor
(1)Default Constructor:
The default constructor is used to provide the default values to the object like 0, null, etc., depending on the type.
class Student3
{
int id;
String name;
//method to display the value of id and name
void display(){System.out.println(id+" "+name);
}
public static void main(String args[]){
//creating objects
Student3 s1=new Student3();
Student3 s2=new Student3();
//displaying values of the object
s1.display();
s2.display();
}
}
Parameterized Constructor: A constructor that has parameters is known as parameterized constructor. If we want to initialize fields of the class with your own values, then use a parameterized constructor.
- class Student4{
- int id;
- String name;
- //creating a parameterized constructor
- Student4(int i,String n){
- id = i;
- name = n;
- }
- //method to display the values
- void display(){System.out.println(id+" "+name);}
- public static void main(String args[]){
- //creating objects and passing values
- Student4 s1 = new Student4(111,"Karan");
- Student4 s2 = new Student4(222,"Aryan");
- //calling method to display the values of object
- s1.display();
- s2.display();
- }
- }
java Program to Solve Simple Banking Problem using constructors
import java.util.Scanner;class bankInternal { int acno; float bal=0; Scanner get = new Scanner(System.in); bankInternal() { System.out.println("Enter Account Number:"); acno = get.nextInt(); System.out.println("Enter Initial Balance:"); bal = get.nextFloat(); } void deposit() { float amount; System.out.println("Enter Amount to be Deposited:"); amount = get.nextFloat(); bal = bal+amount; System.out.println("Deposited! Account Balance is "+bal); } void withdraw() { float amount; System.out.println("Enter Amount to be Withdrawn:"); amount = get.nextFloat(); if(amount<bal) { bal = bal-amount; System.out.println("Amount Withdrawn!! Available Balance: "+bal); } else { System.out.println("Insufficient funds!!"); } }}public class Bank { public static void main(String[] args) { bankInternal myObj = new bankInternal(); myObj.deposit(); myObj.withdraw(); }} |
Super keyword
The super keyword in java is a reference variable that is used to refer parent class objects. The keyword “super” came into the picture with the concept of Inheritance.1. Use of super with variables: This scenario occurs when a derived class and base class has same data members.
2. Use of super with methods: This is used when we want to call parent class method. So whenever a parent and child class have same named methods
Example
class parent
{
void display()
{
System.out.println("this is sunitha");
System.out.println("I am doing java program");
}
}
class child extends parent
{
void display()
{
super.display();
System.out.println("using super keyword");
System.out.println("In inheritance");
}
public static void main(String args[])
{
child c = new child();
c.display();
}
}
{
void display()
{
System.out.println("this is sunitha");
System.out.println("I am doing java program");
}
}
class child extends parent
{
void display()
{
super.display();
System.out.println("using super keyword");
System.out.println("In inheritance");
}
public static void main(String args[])
{
child c = new child();
c.display();
}
}
3. Use of super with constructors: super keyword can also be used to access the parent class constructor
Example
class parentclass
{
int x,y;
parentclass()
{
x=10;
y=15;
}
void display()
{
System.out.println("X is" +x +"Y is "+y);
}
}
class childclass extends parentclass
{
String s="this is java program";
childclass()
{
super();
super.display();
}
void display()
{
System.out.println(s);
}
public static void main(String args[])
{
childclass s =new childclass();
s.display();
}
}
{
int x,y;
parentclass()
{
x=10;
y=15;
}
void display()
{
System.out.println("X is" +x +"Y is "+y);
}
}
class childclass extends parentclass
{
String s="this is java program";
childclass()
{
super();
super.display();
}
void display()
{
System.out.println(s);
}
public static void main(String args[])
{
childclass s =new childclass();
s.display();
}
}
Interfaces
The interface is the part of the class that is accessible to code
located outside of it. A class's interface consists of some combination
of methods, fields, constructors, and other entities.
(i)An interface contains all the incomplete methods which are declared as public,
(ii)The variables are by default static and final variables
(iii)we cannot declare these methods as abstract.
(iv)In interfaces all the methods are by default abstract methods
(iv)In interfaces all the methods are by default abstract methods
(v)The implementation of these methods can be done outside the class.
(vi)the class which implemented these methods are called implementation classes
However, an interface is different from a class in several ways, including −
- You cannot instantiate an interface.
- An interface does not contain any constructors.
- All of the methods in an interface are abstract.
- An interface cannot contain instance fields. The only fields that can appear in an interface must be declared both static and final.
- An interface is not extended by a class; it is implemented by a class.
- An interface can extend multiple interfaces.
Declaring Interfaces
The interface keyword is used to declare an interface. - Interfaces have the following properties −
- An interface is implicitly abstract. You do not need to use the abstract keyword while declaring an interface.
- Each method in an interface is also implicitly abstract, so the abstract keyword is not needed.
- Methods in an interface are implicitly public.
Syntax:
interface <interfacename>
{
static , final variables;
abstract methods;
}
Implementing Interfaces
When a class implements an interface, you can think of the class as
signing a contract, agreeing to perform the specific behaviors of the
interface. If a class does not perform all the behaviors of the
interface, the class must declare itself as abstract.
A class uses the implements keyword to implement an interface.
A class uses the implements keyword to implement an interface.
Syntax:
class classname implements interfacename
{
method body()
{
--
--
}
}
Example
interface myinterface
{
int no=10; //static and final variable
String name="sunitha";// static and final variable
void run();//abstract method
}
class A implements myinterface
{
void run()
{
System.out.println("the no is"+no);
System.out.println("the name is "+name);
}
public static void main(String args[])
{
A a=new A();
a.run();
}
}
Multiple methods in an interface
Example
interface d1
{
int rno=10;
String name="sunitha";
void display();
void show();
void print();
}
class gg implements d1
{
public void display()
{
System.out.println("these are student details");
//System.out.println("the name is"+name);
}
public void show()
{
System.out.println("the no is"+rno);
System.out.println("the name is"+name);
}
public void print()
{
System.out.println(".............exit............");
//System.out.println("the name is"+name);
}
public static void main(String[] args)
{
// System.out.println("Hello World!");
gg g=new gg();
g.display();
g.show();
g.print();
}
}
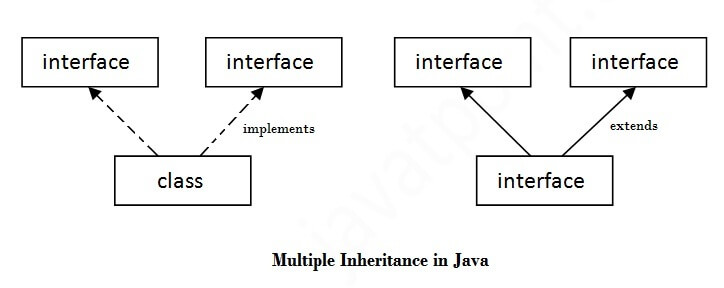
Understanding relationship between classes and interfaces
A class extends another class, an interface extends another interface but a class implements an interface.
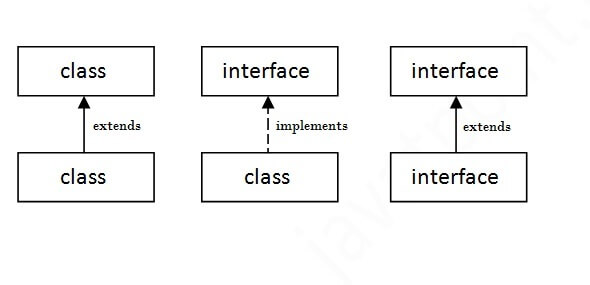 |
Multiple inheritance in Java by interfaceIf a class implements multiple interfaces, or an interface extends multiple interfaces i.e. known as multiple inheritance. |
Extending Multiple Interfaces
A Java class can only extend one parent class. Multiple inheritance
is not allowed. Interfaces are not classes, however, and an interface
can extend more than one parent interface.
The extends keyword is used once, and the parent interfaces are declared in a comma-separated list.
The extends keyword is used once, and the parent interfaces are declared in a comma-separated list.
Example
interface printable
{
void print();
}
interface showable
{
void show();
}
class i2 implements printable, showable
{
public void print()
{
System.out.println("this is a print method");
}
public void show()
{
System.out.println("this is a show method");
}
public static void main(String args[])
{
i2 i=new i2();
i.print();
i.show();
Extends keyword example
interface printable
{
void print();
}
interface showable extends printable
{
void show();
}
class hh implements showable
{
public void print()
{
System.out.println("the printable method");
//System.out.println("the name is"+name);
}
public void show()
{
System.out.println("the showable method");
}
public static void main(String[] args)
{
// System.out.println("Hello World!");
hh h=new hh();
h.print();
h.show();
}
}
{
void print();
}
interface showable
{
void show();
}
class i2 implements printable, showable
{
public void print()
{
System.out.println("this is a print method");
}
public void show()
{
System.out.println("this is a show method");
}
public static void main(String args[])
{
i2 i=new i2();
i.print();
i.show();
Extends keyword example
interface printable
{
void print();
}
interface showable extends printable
{
void show();
}
class hh implements showable
{
public void print()
{
System.out.println("the printable method");
//System.out.println("the name is"+name);
}
public void show()
{
System.out.println("the showable method");
}
public static void main(String[] args)
{
// System.out.println("Hello World!");
hh h=new hh();
h.print();
h.show();
}
}
Difference b/w Abstract classes and Interfaces
Abstract class and interface both are used to achieve abstraction where we can declare the abstract methods. Abstract class and interface both can't be instantiated.
But there are many differences between abstract class and interface that are given below.
| Abstract class | Interface |
|---|---|
| 1) Abstract class can have abstract and non-abstract methods. | Interface can have only abstract methods. Since Java 8, it can have default and static methods also. |
| 2) Abstract class doesn't support multiple inheritance. | Interface supports multiple inheritance. |
| 3) Abstract class can have final, non-final, static and non-static variables. | Interface has only static and final variables. |
| 4) Abstract class can provide the implementation of interface. | Interface can't provide the implementation of abstract class. |
| 5) The abstract keyword is used to declare abstract class. | The interface keyword is used to declare interface. |
| 6) Example: public abstract class Shape{ public abstract void draw(); } | Example: public interface Drawable{ void draw(); } |
MultiThreading
Thread
Thread is basically a lightweight sub-process, a smallest unit of processing. Threads are independent, if there occurs exception in one thread, it doesn't affect other threads. It shares a common memory area.Multi -Threading
A multi-threaded program contains
two or more parts that can run concurrently and each part can handle a
different task at the same time making optimal use of the available resources
specially when your computer has multiple CPUs.
But we use multithreading than
multiprocessing because threads share a common memory area. They don't allocate
separate memory area so saves memory, and context-switching between the threads
takes less time than process.
Java Multithreading is mostly used
in games, animation etc.
Advantages of Java Multithreading
1) It doesn't block the user because threads are independent and you can perform multiple operations at same time.
2) You can perform many
operations together so it saves time.
3) Threads are independent so
it doesn't affect other threads if exception occur in a single thread.
-->Differences between multi threading and multiprocessing
Multi -Threading
A multi-threaded program contains two or more parts that can run concurrently and each part can handle a different task at the same time making optimal use of the available resources specially when your computer has multiple CPUs.Multitasking
Multitasking is a process of executing multiple tasks simultaneously. We use multitasking to utilize the CPU. Multitasking can be achieved by two ways:- Process-based Multitasking(Multiprocessing)
- Thread-based Multitasking(Multithreading)
1) Process-based Multitasking (Multiprocessing)
- Each process have its own address in memory i.e. each process allocates separate memory area.
- Process is heavyweight.
- Cost of communication between the process is high.
- Switching from one process to another require some time for saving and loading registers, memory maps, updating lists etc.
2) Thread-based Multitasking (Multithreading)
- Threads share the same address space.
- Thread is lightweight.
- Cost of communication between the thread is low.
There are two ways to create a
thread:
- By extending Thread class
- By implementing Runnable interface.
Thread
class:
Thread class provide constructors
and methods to create and perform operations on a thread.Thread class extends
Object class and implements Runnable interface.
|
Commonly used Constructors of Thread class:
|
Commonly
used methods of Thread class:
|
-->program By using Thread class
class mythread extends Thread
{
public void run()
{
System.out.println("thread
is running");
}
public static
void main(String[] args)
{
//System.out.println("Hello
World!");
mythread t=new
mythread();
t.start();
}
}
//Program By
using Runnable Interface
class Multi3 implements Runnable{
public void run(){
System.out.println("thread is running...");
}
public static void main(String args[]){
Multi3 m1=new Multi3();
Thread t1 =new Thread(m1);
t1.start();
}
}
//
Java code for thread creation by
extending the Thread class
class MultithreadingDemo extends
Thread
{
public void run()
{
try
{
// Displaying the thread that is
running
System.out.println ("Thread
" + Thread.currentThread().getId()
+ " is running");
}
catch (Exception e)
{
// Throwing an exception
System.out.println ("Exception
is caught");
}
}
}
// Main Class
public class Multithread
{
public static void main(String[] args)
{
int n = 8; // Number of threads
for (int i=0; i<8; i++)
{
MultithreadingDemo object = new
MultithreadingDemo();
object.start();
}
}
}
Thread creation by implementing the
Runnable Interface
class MultithreadingDemo implements Runnable
class MultithreadingDemo implements Runnable
{
public void run()
{
try
{
//
Displaying the thread that is running
System.out.println
("Thread " +
Thread.currentThread().getId()
+
"
is running");
}
catch (Exception
e)
{
//
Throwing an exception
System.out.println
("Exception is caught");
}
}
}
// Main Class
class Multithread
{
public static void main(String[]
args)
{
int n
= 8; // Number of threads
for (int i=0;
i<8; i++)
{
Thread
object = new Thread(new MultithreadingDemo());
object.start();
}
}
}
-->Naming ThreadThe Thread class provides methods to change and get the name of a thread. By default, each thread has a name i.e. thread-0, thread-1 and so on. By we can change the name of the thread by using setName() method. The syntax of setName() and getName() methods are given below:public String getName(): is used to return the name of a thread.public void setName(String name): is used to change the name of a thread.Example of naming a threadclass TestMultiNaming1 extends Thread{public void run(){System.out.println("running...");}public static void main(String args[]){TestMultiNaming1 t1=new TestMultiNaming1();TestMultiNaming1 t2=new TestMultiNaming1();System.out.println("Name of t1:"+t1.getName());System.out.println("Name of t2:"+t2.getName());t1.start();t2.start();t1.setName("Sonoo Jaiswal");System.out.println("After changing name of t1:"+t1.getName());}}Sleep method in javaThe sleep() method of Thread class is used to sleep a thread for the specified amount of time.Syntax of sleep() method in javaThe Thread class provides two methods for sleeping a thread:
Example programclass TestCallRun2 extends Thread{public void run(){for(int i=1;i<5;i++){try{Thread.sleep(500);}catch(InterruptedException e){System.out.println(e);}System.out.println(i);}}public static void main(String args[]){TestCallRun2 t1=new TestCallRun2();TestCallRun2 t2=new TestCallRun2();t1.start();t2.start();}}Priority of a Thread (Thread Priority):
3 constants defiend in Thread class:
|
Example of priority of a Thread:
class TestMultiPriority1 extends Thread{
public void run(){
System.out.println("running thread name is:"+Thread.currentThread().getName());
System.out.println("running thread priority is:"+Thread.currentThread().getPriority());
}
public static void main(String args[]){
TestMultiPriority1 m1=new TestMultiPriority1();
TestMultiPriority1 m2=new TestMultiPriority1();
m1.setPriority(Thread.MIN_PRIORITY);
m2.setPriority(Thread.MAX_PRIORITY);
m1.start();
m2.start();
}
}
Daemon Thread in Java
Daemon thread in java is a service provider thread that provides services to the user thread. Its life depend on the mercy of user threads i.e. when all the user threads dies, JVM terminates this thread automatically.There are many java daemon threads running automatically e.g. gc, finalizer etc.
Program
public class
TestDaemonThread1 extends Thread{
public void run(){
if(Thread.currentThread().isDaemon()){//checking
for daemon thread
System.out.println("daemon thread
work");
}
else{
System.out.println("user thread
work");
}
}
public static void main(String[] args){
TestDaemonThread1 t1=new
TestDaemonThread1();//creating thread
TestDaemonThread1 t2=new
TestDaemonThread1();
TestDaemonThread1 t3=new
TestDaemonThread1();
t1.setDaemon(true);//now t1 is daemon
thread
t1.start();//starting threads
t2.start();
t3.start();
}
}
INTERTHREAD COMMUNICATION
Java provide benefits of avoiding thread pooling using inter-thread communication.
The wait(), notify(), and notifyAll() methods of Object class are used for this purpose.
These method are implemented as final methods in Object,so that all classes have them.
All the three method can be called only from within a synchronized context.
(i)wait() tells calling thread to give up monitor
and go to sleep until some other thread
enters the same monitor and call notify.
(ii)notify() wakes up a thread that
called wait() on same object.
(iii)notifyAll() wakes up all the thread that called wait()
on same object.
Program
class Pen{}
class Paper{}
public class Write {
public static void main(String[] args)
{
final Pen pn =new Pen();
final Paper pr =new Paper();
Thread t1 = new Thread(){
public void run()
{
synchronized(pn)
{
System.out.println("Thread1 is holding Pen");
try{
Thread.sleep(1000);
}catch(InterruptedException e){}
synchronized(pr)
{ System.out.println("Requesting for Paper"); }
}
}
};
Thread t2 = new Thread(){
public void run()
{
synchronized(pr)
{
System.out.println("Thread2 is holding Paper");
try{
Thread.sleep(1000);
}catch(InterruptedException e){}
synchronized(pn)
{ System.out.println("requesting for Pen"); }
}
}
};
t1.start();
t2.start();
}
}
APPLETS
Commonly used methods of Graphics class:
(i)public abstract void drawString(String str, int x, int y)
is used to draw the specified string.
(ii)public void drawRect(int x, int y, int width, int height)
draws a rectangle with the specified width and height.
(iii)public abstract void fillRect(int x, int y, int width, int height)
is used to fill rectangle with the default color and specified width and height.
(iv)public abstract void drawOval(int x, int y, int width, int height)
is used to draw oval with the specified width and height.
(v)public abstract void fillOval(int x, int y, int width, int height)
is used to fill oval with the default color and specified width and height.
(vi)public abstract void drawLine(int x1, int y1, int x2, int y2)
is used to draw line between the points(x1, y1) and (x2, y2).
(vii)public abstract void drawArc(int x,int y,int width,int height,int startAngle, int arcAngle)
is used draw a circular or elliptical arc.
(viii)public abstract void fillArc(int x, int y, int width, int height, int startAngle, int arcAngle)
is used to fill a circular or elliptical arc.
(ix)public abstract void setColor(Color c)
is used to set the graphics current color to the specified color.
(x) public abstract void setFont(Font font)
is used to set the graphics current font to the specified font.
Example1:
import java.applet.*;
import java.awt.*;
public class Shapes extends Applet {
int x = 300, y = 100, r = 50;
public void paint(Graphics g) {
g.drawLine(30,300,200,10);
g.drawOval(x-r,y-r,100,100);
g.drawRect(400,50,200,100);
}
}
/*<applet code="Shapes.class" width=300 height=300>
</applet>*/
Example2:
import java.applet.*;
import java.awt.*;
public class fillColor extends Applet
{
public void paint(Graphics g)
{
g.drawRect(300,150,200,100);
g.setColor(Color.green);
g.fillRect( 300,150, 200, 100 );
g.setColor(Color.magenta);
g.drawString("Rectangle",500,150);
}
}
/*<applet code="fillColor.class" width=300 height=300>
</applet>*/
Example3:
import java.applet.Applet;import java.awt.*;
public class GraphicsDemo extends Applet{
public void paint(Graphics g){
g.setColor(Color.blue);
g.drawString("Welcome",50, 50);
g.drawLine(20,30,20,300);
g.drawRect(70,100,30,30);
g.fillRect(170,100,30,30);
g.drawOval(70,200,30,30);
g.setColor(Color.red);
g.fillOval(170,200,30,30);
g.drawArc(90,150,30,30,30,270);
g.fillArc(270,150,30,30,0,180);
}
}
/* <applet code="GraphicsDemo.class" width="300" height="300">
</applet> */
Example4:
import java.applet.*;import java.awt.*;
import java.util.Date;
public class GFG extends Applet
{
public void paint(Graphics g)
{
Date dt = new Date();
super.showStatus("Today is" + dt);
}
}
/*<applet code="GFG.class" width=300 height=300>
</applet>*/
Event Handling
What is an Event?
Change in the state of an object is known as event i.e. event describes the change in state of source. Events are generated as result of user interaction with the graphical user interface components.For example, clicking on a button, moving the mouse, entering a character through keyboard,selecting an item from list, scrolling the page are the activities that causes an event to happen
Define
Event Handling
Event Handling is the mechanism that controls the event and
decides what should happen if an event occurs. This mechanism have the code
which is known as event handler that is executed when an event occurs.
Any program that uses GUI (graphical
user interface) such as Java application written for windows, is event driven.
Event describes the change in state of any object.
For Example : Pressing a button,
Entering a character in Textbox, Clicking or Dragging a mouse, etc.
The
event handling Java involves four types of classes.1. Event Sources
2. Event classes
3. Event Listeners
4. Event Adapters
1. Event Sources
Event sources are components, subclasses of java.awt.Component, capable to generate events. The event source can be a button, TextField or a Frame etc.
2. Event classes
Almost every event source generates an event and is named by some Java class. For example, the event generated by button is known as ActionEvent and that of Checkbox is known as ItemEvent. All the events are listed in java.awt.event package. Following list gives a few components and their corresponding listeners.
Following
are the list of Event Classes :
- ActionEvent : Button, TextField, List, Menu
- WindowEvent : Frame
- ItemEvent : Checkbox, List
- AdjustmentEvent : Scrollbar
- MouseEvent : Mouse
- KeyEvent : Keyboard
The events generated by the GUI components are handled by a special group of interfaces known as "listeners". Note, Listener is an interface. Every component has its own listener, say, AdjustmentListener handles the events of scrollbar Some listeners handle the events of multiple components. For example, ActionListener handles the events of Button, TextField, List and Menus. Listeners are from java.awt.event package.
More description on listeners and list of listeners is available at Java AWT Listeners.
4. Event Adapters
When a listener includes many abstract methods to override, the coding becomes heavy to the programmer. For example, to close the frame, you override seven abstract methods of WindowListener, in which, infact you are using only one method. To avoid this heavy coding, the designers come with another group of classes known as "adapters". Adapters are abstract classes defined in java.awt.event package. Every listener that has more than one abstract method has got a corresponding adapter class.
More description on adapters and list of adapters is available at Java AWT Adapters.
How to Write an Action Listener
Action listeners are probably the easiest — and most common — event handlers to implement. You implement an action listener to define what should be done when an user performs certain operation.An action event occurs, whenever an action is performed by the user. Examples: When the user clicks a button, chooses a menu item, presses Enter in a text field. The result is that an
actionPerformed message
is sent to all action listeners that are registered on the relevant component.To write an Action Listener, follow the steps given below:
- Declare an event handler class and specify that the class either implements an ActionListener interface or extends a class that implements an ActionListener interface.
public class MyClass implements ActionListener {
- Register an instance of the event handler class as a listener on one or more components.
someComponent.addActionListener(instanceOfMyClass);
- Include code that implements the methods in listener interface.
public void actionPerformed(ActionEvent e) {
...//code that reacts to the action...
}
àAn example of Event Handling
import java.awt.*;
import java.awt.event.*;
class AEvent extends Frame implements ActionListener{
TextField tf;
AEvent(){
//create components
tf=new TextField();
tf.setBounds(60,50,170,20);
Button b=new Button("click me");
b.setBounds(100,120,80,30);
//register listener
b.addActionListener(this);//passing current instance
//add components and set size, layout and visibility
add(b);add(tf);
setSize(300,300);
setLayout(null);
setVisible(true);
}
public void actionPerformed(ActionEvent e){
tf.setText("Welcome");
}
public static void main(String args[]){
new AEvent();
}
}
àComponents of Event Handling
Event handling has three main components,- Events : An event is a change in state of an object.
- Events Source : Event source is an object that generates an event.
- Listeners : A listener is an object that listens to the event. A listener gets notified when an event occurs.
A program can even have more than one listener for a single
kind of event from a single event source.

- Important Event Classes and Interface
Event Classes
|
Description
|
Listener Interface
|
ActionEvent
|
generated when button is pressed, menu-item is selected,
list-item is double clicked
|
ActionListener
|
MouseEvent
|
generated when mouse is dragged, moved,clicked,pressed or
released and also when it enters or exit a component
|
MouseListener
|
KeyEvent
|
generated when input is received from keyboard
|
KeyListener
|
ItemEvent
|
generated when check-box or list item is clicked
|
ItemListener
|
TextEvent
|
generated when value of textarea or textfield is changed
|
TextListener
|
MouseWheelEvent
|
generated when mouse wheel is moved
|
MouseWheelListener
|
WindowEvent
|
generated when window is activated, deactivated,
deiconified, iconified, opened or closed
|
WindowListener
|
ComponentEvent
|
generated when component is hidden, moved, resized or set
visible
|
ComponentEventListener
|
ContainerEvent
|
generated when component is added or removed from
container
|
ContainerListener
|
AdjustmentEvent
|
generated when scroll bar is manipulated
|
AdjustmentListener
|
FocusEvent
|
generated when component gains or loses keyboard focus
|
FocusListener
|
à Java MouseListener Interface
The Java MouseListener is notified whenever you change the state of mouse. It is notified against MouseEvent. The MouseListener interface is found in java.awt.event package. It has five methods.Methods of MouseListener interface
The signature of 5 methods found in MouseListener interface are given below:- public abstract void mouseClicked(MouseEvent e);
- public abstract void mouseEntered(MouseEvent e);
- public abstract void mouseExited(MouseEvent e);
- public abstract void mousePressed(MouseEvent e);
- public abstract void mouseReleased(MouseEvent e);
Example of Mouse Event
import java.awt.*;
import java.awt.event.*;
public class MouseListenerExample extends Frame implements MouseListener{
Label l;
MouseListenerExample(){
addMouseListener(this);
l=new Label();
l.setBounds(20,50,100,20);
add(l);
setSize(300,300);
setLayout(null);
setVisible(true);
}
public void mouseClicked(MouseEvent e) {
l.setText("Mouse Clicked");
}
public void mouseEntered(MouseEvent e) {
l.setText("Mouse Entered");
}
public void mouseExited(MouseEvent e) {
l.setText("Mouse Exited");
}
public void mousePressed(MouseEvent e) {
l.setText("Mouse Pressed");
}
public void mouseReleased(MouseEvent e) {
l.setText("Mouse Released");
}
public static void main(String[] args) {
new MouseListenerExample();
}
}
Example
2
import java.awt.*;
import java.awt.event.*;
public class MouseL extends Frame implements MouseListener{
MouseListenerExample2(){
addMouseL (this);
setSize(300,300);
setLayout(null);
setVisible(true);
}
public void mouseClicked(MouseEvent e) {
Graphics g=getGraphics();
g.setColor(Color.BLUE);
g.fillOval(e.getX(),e.getY(),30,30);
}
public void mouseEntered(MouseEvent e) {}
public void mouseExited(MouseEvent e) {}
public void mousePressed(MouseEvent e) {}
public void mouseReleased(MouseEvent e) {}
public static void main(String[] args) {
new MouseL();
}
}
àJava MouseMotionListener Interface
The Java MouseMotionListener is notified whenever you move or drag mouse. It is notified against MouseEvent. The MouseMotionListener interface is found in java.awt.event package. It has two methods.Methods of MouseMotionListener interface
The signature of 2 methods found in MouseMotionListener interface are given below:- public abstract void mouseDragged(MouseEvent e);
- public abstract void mouseMoved(MouseEvent e);
Example
import java.awt.*;
import java.awt.event.*;
public class MouseMotionListenerExample extends Frame implements MouseMotionListener{
MouseMotionListenerExample(){
addMouseMotionListener(this);
setSize(300,300);
setLayout(null);
setVisible(true);
}
public void mouseDragged(MouseEvent e) {
Graphics g=getGraphics();
g.setColor(Color.BLUE);
g.fillOval(e.getX(),e.getY(),20,20);
}
public void mouseMoved(MouseEvent e) {}
public static void main(String[] args) {
new MouseMotionListenerExample(); }}
àJava KeyListener Interface
The Java KeyListener is notified whenever you change the state of key. It is notified against KeyEvent. The KeyListener interface is found in java.awt.event package. It has three methods.Methods of KeyListener interface
The signature of 3 methods found in KeyListener interface are given below:- public abstract void keyPressed(KeyEvent e);
- public abstract void keyReleased(KeyEvent e);
- public abstract void keyTyped(KeyEvent e);
Java KeyListener Example
import java.awt.*;
import java.awt.event.*;
public class KeyListenerExample extends Frame implements KeyListener{
Label l;
TextArea area;
KeyListenerExample(){
l=new Label();
l.setBounds(20,50,100,20);
area=new TextArea();
area.setBounds(20,80,300, 300);
area.addKeyListener(this);
add(l);add(area);
setSize(400,400);
setLayout(null);
setVisible(true);
}
public void keyPressed(KeyEvent e) {
l.setText("Key Pressed");
}
public void keyReleased(KeyEvent e) {
l.setText("Key Released");
}
public void keyTyped(KeyEvent e) {
l.setText("Key Typed");
}
public static void main(String[] args) {
new KeyListenerExample();
}
}
GUI PROGRAMMING
AWT:AWT stands for Abstract Window Toolkit. It is a toolkit of classes with which a programmer can develop Graphics and Graphical User Interface components. AWT gives a front-end technology to Java using which a user can interact with a running process;
All the classes required for developing graphics and GUI are placed in
the package java.awt and the classes
required for event handling are placed separately in the sub package java.awt.event. AWT components called heavyweight
components
- Drawing graphics
- Studying layout managers
- Developing GUI components
- Handling events – Event handling
n Swing – A much better set of graphics tools
n Container – a graphic element that can hold other graphic elements (and is itself a Component)
n Component – a graphic element (such as a Button or a TextArea) provided by a graphics toolkit
n listener – A piece of code that is activated when a particular kind of event occurs
All Listeners are interfaces, not
classes
class
MyButtonListener implements
ActionListener {
layout manager – An object whose job it is to arrange Components in a Container
An interface is a group of methods that must be
supplied
·

Creating a Frame
There are two ways to create a Frame. They are,- By Instantiating Frame class
- By extending Frame class
àCreating Frame Window by Instantiating Frame class
import java.awt.*;
public class Testawt
{
Testawt()
{
Frame fm=new Frame(); //Creating a frame.
Label lb = new Label("welcome to java graphics"); //Creating a label
fm.add(lb); //adding label to the frame.
fm.setSize(300, 300); //setting frame size.
fm.setVisible(true); //set frame visibilty true.
}
public static void main(String args[])
{
Testawt ta = new Testawt();
}
}
à Creating Frame window by extending Frame class
package testawt;
import java.awt.*;
import java.awt.event.*;
public class Testawt extends Frame
{
public Testawt()
{
Button btn=new Button("Hello World");
add(btn); //adding a new Button.
setSize(400, 500); //setting size.
setTitle("StudyTonight"); //setting title.
setLayout(new FlowLayout()); //set default layout for frame.
setVisible(true); //set frame visibilty true.
}
public static void main (String[] args)
{
Testawt ta = new Testawt(); //creating a frame.
}
import java.awt.*;
import java.awt.event.*;
class Calculator implements ActionListener
{
//Declaring
Objects
Frame f=new Frame();
Label l1=new
Label("First Number");
Label l2=new
Label("Second Number");
Label l3=new
Label("Result");
TextField t1=new
TextField();
TextField t2=new
TextField();
TextField t3=new
TextField();
Button b1=new
Button("Add");
Button b2=new
Button("Sub");
Button b3=new
Button("Mul");
Button b4=new
Button("Div");
Button b5=new
Button("Cancel");
Calculator()
{
//Giving
Coordinates
l1.setBounds(50,100,100,20);
l2.setBounds(50,140,100,20);
l3.setBounds(50,180,100,20);
t1.setBounds(200,100,100,20);
t2.setBounds(200,140,100,20);
t3.setBounds(200,180,100,20);
b1.setBounds(50,250,50,20);
b2.setBounds(110,250,50,20);
b3.setBounds(170,250,50,20);
b4.setBounds(230,250,50,20);
b5.setBounds(290,250,50,20);
//Adding
components to the frame
f.add(l1);
f.add(l2);
f.add(l3);
f.add(t1);
f.add(t2);
f.add(t3);
f.add(b1);
f.add(b2);
f.add(b3);
f.add(b4);
f.add(b5);
b1.addActionListener(this);
b2.addActionListener(this);
b3.addActionListener(this);
b4.addActionListener(this);
b5.addActionListener(this);
f.setLayout(null);
f.setVisible(true);
f.setSize(400,350);
}
public void actionPerformed(ActionEvent
e)
{
int
n1=Integer.parseInt(t1.getText());
int
n2=Integer.parseInt(t2.getText());
if(e.getSource()==b1)
{
t3.setText(String.valueOf(n1+n2));
}
if(e.getSource()==b2)
{
t3.setText(String.valueOf(n1-n2));
}
if(e.getSource()==b3)
{
t3.setText(String.valueOf(n1*n2));
}
if(e.getSource()==b4)
{
t3.setText(String.valueOf(n1/n2));
}
if(e.getSource()==b5)
{
System.exit(0);
}
}
public
static void main(String...s)
{
new
Calculator();
}
}
àJava swing
Java Swing is a part of Java Foundation Classes (JFC) that
is used to create window-based
applications. It is built
on the top of AWT (Abstract Windowing Toolkit) API and entirely written in
java.Unlike AWT, Java Swing provides platform-independent and lightweight components.
The javax.swing package provides classes for java swing API such as JButton, JTextField, JTextArea, JRadioButton, JCheckbox, JMenu, JColorChooser etc.
1)
|
AWT components are platform-dependent.
|
Java swing components are platform-independent.
|
2)
|
AWT components are heavyweight.
|
Swing components are lightweight.
|
3)
|
AWT doesn't support pluggable
look and feel.
|
Swing supports pluggable look
and feel.
|
4)
|
AWT provides less components
than Swing.
|
Swing provides more powerful
components such as tables, lists, scrollpanes, colorchooser, tabbedpane
etc.
|
5)
|
AWT doesn't follows MVC(Model
View Controller) where model represents data, view represents presentation
and controller acts as an interface between model and view.
|
Swing follows MVC.
|
- Top level Containers
- It inherits Component and Container of AWT.
- It cannot be contained within other containers.
- Heavyweight.
- Example: JFrame, JDialog, JApplet
- Lightweight Containers
- It inherits JComponent class.
- It is a general purpose container.
- It can be used to organize related components together.
- Example: JPanel
JWindow : This is Swing's version of Window and has descended directly from Window class. Like Window it uses BorderLayout by default.
JPanel : JPanel is Swing's version of AWT class Panel and uses the same default layout, FlowLayout. JPanel is descended directly from JComponent.
JFrame : JFrame is Swing's version of Frame and is descended directly from Frame class. The component which is added to the Frame, is refered as its Content.
Creating a JFrame
There are two ways to create a JFrame Window.
(i) By instantiating JFrame class.
(ii) By extending JFrame class.
(i) Example program By instantiating JFrame class.
import javax.swing.*; //importing swing package
import java.awt.*; //importing awt package
public class First
{
JFrame jf;
public First() {
jf = new JFrame("MyWindow"); //Creating a JFrame with name MyWindow
JButton btn = new JButton("Say Hello");//Creating a Button named Say Hello
jf.add(btn); //adding button to frame
jf.setLayout(new FlowLayout()); //setting layout using FlowLayout object
jf.setDefaultCloseOperation(JFrame.EXIT_ON_CLOSE); //setting close operation.
jf.setSize(400, 400); //setting size
jf.setVisible(true); //setting frame visibility
}
public static void main(String[] args)
{
new First();
}
}
(ii)Creating JFrame window by extending JFrame class
import javax.swing.*; //importing swing package
import java.awt.*; //importing awt package
public class Second extends JFrame
{
public Second()
{
setTitle("MyWindow"); //setting title of frame as MyWindow
JLabel lb = new JLabel("Welcome to My Second Window");//Creating a label named Welcome to My Second Window
add(lb); //adding label to frame.
setLayout(new FlowLayout()); //setting layout using FlowLayout object.
setDefaultCloseOperation(JFrame.EXIT_ON_CLOSE); //setting close operation.
setSize(400, 400); //setting size
setVisible(true); //setting frame visibility
}
public static void main(String[] args)
{
new Second();
}
}
àSwing components
JTextField
JTextField is used for taking input of single line of text. It is most widely used text component. It has three constructors,JTextField(int cols)
JTextField(String str, int cols)
JTextField(String str)
JButton
JButton class provides functionality of a button. JButton class has three constuctors,JButton(Icon ic)
JButton(String str)
JButton(String str, Icon ic)
JCheckBox
JCheckBox class is used to create checkboxes in frame. Following is constructor for JCheckBox,JCheckBox(String str)
JRadioButton
Radio button is a group of related button in which only one can be selected. JRadioButton class is used to create a radio button in Frames. Following is the constructor for JRadioButton,JRadioButton(String str)
JComboBox
Combo box is a combination of text fields and drop-down list.JComboBox component is used to create a combo box in Swing. Following is the constructor for JComboBox,JComboBox(String arr[])àSwing Example of Combobox program
import javax.swing.*;
import java.awt.event.*;
import java.awt.*;
public class Test extends JFrame
{
String name[] = {"Abhi","Adam","Alex","Ashkay"}; //list of name.
public Test()
{
JComboBox jc = new JComboBox(name); //initialzing combo box with list of name.
add(jc); //adding JComboBox to frame.
setLayout(new FlowLayout());
setDefaultCloseOperation(JFrame.EXIT_ON_CLOSE);
setSize(400, 400);
setVisible(true);
}
public static void main(String[] args)
{
new Test();
}
}
àSwing Example
of checkbox programimport javax.swing.*;
import java.awt.event.*;
import java.awt.*;
public class Test extends JFrame
{
public Test()
{
JCheckBox jcb = new JCheckBox("yes"); //creating JCheckBox.
add(jcb); //adding JCheckBox to frame.
jcb = new JCheckBox("no"); //creating JCheckBox.
add(jcb); //adding JCheckBox to frame.
jcb = new JCheckBox("maybe"); //creating JCheckBox.
add(jcb); //adding JCheckBox to frame.
setLayout(new FlowLayout());
setDefaultCloseOperation(JFrame.EXIT_ON_CLOSE);
setSize(400, 400);
setVisible(true);
}
public static void main(String[] args)
{
new Test();
}
}
àSwing Example
of button program
import
javax.swing.*;
import
java.awt.event.*;
public
class EventH implements ActionListener{
JFrame
f;
JButton
b=new JButton("Say Hi");
public
void createUI()
{
f = new JFrame();
f.setDefaultCloseOperation(JFrame.EXIT_ON_CLOSE);
f.setLayout(null);
JLabel tbLabel = new JLabel("Click
On Button");
b.addActionListener(this);
tbLabel.setBounds(75, 50, 100,
20);
b.setBounds(75,75,150,20);
f.add(tbLabel);
f.add(b);
f.setVisible(true);
f.setSize(300,200);
}
public static void main(String[]
args){
EventH dd = new EventH();
dd.createUI(); }
@Override
public void actionPerformed(ActionEvent
e) {
b = (JButton)e.getSource();
sayHi();
}
public void sayHi()
{
JOptionPane.showMessageDialog(f,
"Hi, To All.", "Say Hi", JOptionPane.INFORMATION_MESSAGE);
}
}
àSwing Example
of Textfield program
import javax.swing.*;
import java.awt.event.*;
import java.awt.*;
public class MyTextField extends JFrame
{
public MyTextField()
{
JTextField jtf = new JTextField(20); //creating JTextField.
add(jtf); //adding JTextField to frame.
setLayout(new FlowLayout());
setDefaultCloseOperation(JFrame.EXIT_ON_CLOSE);
setSize(400, 400);
setVisible(true);
}
public static void main(String[] args)
{
new MyTextField();
}
}
àWrite a program to change background color of a frame (Using Action Event)
import java.awt.*; //importing awt package
import javax.swing.*; //importing swing package
import java.awt.event.*; //importing event package
//For an event to occur upon clicking the button, ActionListener interface should be implemented
class StColor extends JFrame implements ActionListener{
JFrame frame;
JPanel panel;
JButton b1,b2,b3,b4,b5;
StColor(){
frame = new JFrame("COLORS");
frame.setDefaultCloseOperation(JFrame.EXIT_ON_CLOSE);
panel = new JPanel(); //Creating a panel which is a container and will hold all the buttons
panel.setSize(100, 50);
b1 = new JButton("BLUE"); //Creating a button named BLUE
b1.addActionListener(this); //Registering the button with the listener
b2 = new JButton("RED"); //Creating a button named RED
b2.addActionListener(this); //Registering the button with the listener
b3 = new JButton("CYAN");//Creating a button named CYAN
b3.addActionListener(this);//Registering the button with the listener
b4 = new JButton("PINK"); //Creating a button named PINK
b4.addActionListener(this); //Registering the button with the listener
b5 = new JButton("MAGENTA"); //Creating a button named MAGENTA
b5.addActionListener(this); //Registering the button with the listener
//Adding buttons to the Panel
panel.add(b1);
panel.add(b2);
panel.add(b3);
panel.add(b4);
panel.add(b5);
frame.getContentPane().add(panel); //adding panel to the frame
frame.setSize(500,300);
frame.setVisible(true);
frame.setLayout(new FlowLayout());
}
//The below method is called whenever a button is clicked
@Override
public void actionPerformed(ActionEvent e) {
//This method returns an object of the button on which the Event-
Pressing of button initially occurred
Object see = e.getSource();
if(see ==(b1)){ //Checking if the object returned is of button1
frame.getContentPane().setBackground(java.awt.Color.blue); //changing the panel color to blue
}
if(see == b2){ //Checking if the object returned is of button2
frame.getContentPane().setBackground(java.awt.Color.red); //changing the panel color to red
}
if(see == b3){ //Checking if the object returned is of button3
frame.getContentPane().setBackground(java.awt.Color.cyan);//changing the panel color to cyan
}
if(see == b4){ //Checking if the object returned is of button4
frame.getContentPane().setBackground(java.awt.Color.pink); //changing the panel color to pink
}
if(see == b5){ //Checking if the object returned is of button5
frame.getContentPane().setBackground(java.awt.Color.magenta); //changing the panel color to magenta
}
}
}
class Test {
public static void main(String[] args) {
StColor o = new StColor();
}
}
àMVC ArchitectureMVC Pattern stands for Model-View-Controller Pattern. This pattern is used to separate application's concerns.
·
Model - Model represents an object or
JAVA POJO carrying data. It can also have logic to update controller if its
data changes.
·
View - View represents the visualization
of the data that model contains.
·
Controller - Controller acts on both
model and view. It controls the data flow into model object and updates the
view whenever data changes. It keeps view and model separate.

Model 1 and Model 2 (MVC) Architecture
Before developing the web applications, we need to have idea about design models. There are two types of programming models (design models)- Model 1 Architecture
- Model 2 (MVC) Architecture
(i)Model 1 Architecture
Servlet and JSP are the main technologies to develop the web applications.Servlet was considered superior to CGI. Servlet technology doesn't create process, rather it creates thread to handle request. The advantage of creating thread over process is that it doesn't allocate separate memory area. Thus many subsequent requests can be easily handled by servlet.
Problem in Servlet technology Servlet needs to recompile if any designing code is modified. It doesn't provide separation of concern. Presentation and Business logic are mixed up.
JSP overcomes almost all the problems of Servlet. It provides better separation of concern, now presentation and business logic can be easily separated. You don't need to redeploy the application if JSP page is modified. JSP provides support to develop web application using JavaBean.

- Browser sends request for the JSP page
- JSP accesses Java Bean and invokes business logic
- Java Bean connects to the database and get/save data
- Response is sent to the browser which is generated by JSP
Advantage of Model 1 Architecture
- Easy and Quick to develop web application
Disadvantage of Model 1 Architecture
- Navigation control is decentralized since every page contains the logic to determine the next page. If JSP page name is changed that is referred by other pages, we need to change it in all the pages that leads to the maintenance problem.
- Time consuming You need to spend more time to develop custom tags in JSP. So that we don't need to use scriptlet tag.
- Hard to extend It is better for small applications but not for large applications.
(ii)Model 2 (MVC) Architecture
Model 2 is based on the MVC (Model View Controller) design pattern. The MVC design pattern consists of three modules model, view and controller.Model The model represents the state (data) and business logic of the application.
View The view module is responsible to display data i.e. it represents the presentation.
Controller The controller module acts as an interface between view and model. It intercepts all the requests i.e. receives input and commands to Model / View to change accordingly.

Advantage of Model 2 (MVC) Architecture
- Navigation control is centralized Now only controller contains the logic to determine the next page.
- Easy to maintain
- Easy to extend
- Easy to test
- Better separation of concerns
Disadvantage of Model 2 (MVC) Architecture
- We need to write the controller code self. If we change the controller code, we need to recompile the class and redeploy the application.
àLayoutManagers
A Layout Manager is associated with
every Container
. The layout manager is responsible
for positioning components in the container when the container is redrawn.
•Basic layout manager classes
(i)FlowLayout
IT
arranges components from left to right, top to bottom.
The FlowLayout is used to arrange the components in a line, one after
another (in a flow). It is the default layout of applet or panel. Fields of FlowLayout class
- public static final int LEFT
- public static final int RIGHT
- public static final int CENTER
- public static final int LEADING
- public static final int TRAILING
Constructors of FlowLayout class
- FlowLayout(): creates a flow layout with centered alignment and a default 5 unit horizontal and vertical gap.
- FlowLayout(int align): creates a flow layout with the given alignment and a default 5 unit horizontal and vertical gap.
- FlowLayout(int align, int hgap, int vgap): creates a flow layout with the given alignment and the given horizontal and vertical gap.
Example program on Flow Layout
import java.awt.*;
import javax.swing.*;
public class MyFlowLayout{
JFrame f;
MyFlowLayout(){
f=new JFrame();
JButton b1=new JButton("1");
JButton b2=new JButton("2");
JButton b3=new JButton("3");
JButton b4=new JButton("4");
JButton b5=new JButton("5");
f.add(b1);f.add(b2);f.add(b3);f.add(b4);f.add(b5);
f.setLayout(new FlowLayout(FlowLayout.RIGHT));
//setting flow layout of right alignment
f.setSize(300,300);
f.setVisible(true);
}
public static void main(String[] args) {
new MyFlowLayout();
}
}
(ii)GridLayout - regularly spaced rows and columns
The GridLayout is used to arrange the components in rectangular grid. One
component is displayed in each rectangle.Constructors of GridLayout class
1.
GridLayout(): creates a grid
layout with one column per component in a row.
2.
GridLayout(int
rows, int columns): creates a grid layout with the given rows and
columns but no gaps between the components.
3.
GridLayout(int
rows, int columns, int hgap, int vgap): creates a grid layout with the
given rows and columns alongwith given horizontal and vertical gaps.
Example
program on Grid Layout
import java.awt.*;
import javax.swing.*;
public class MyGridLayout{
JFrame f;
MyGridLayout(){
f=new JFrame();
JButton b1=new JButton("1");
JButton b2=new JButton("2");
JButton b3=new JButton("3");
JButton b4=new JButton("4");
JButton b5=new JButton("5");
JButton b6=new JButton("6");
JButton b7=new JButton("7");
JButton b8=new JButton("8");
JButton b9=new JButton("9");
f.add(b1);f.add(b2);f.add(b3);f.add(b4);f.add(b5);
f.add(b6);f.add(b7);f.add(b8);f.add(b9);
f.setLayout(new GridLayout(3,3));
//setting grid layout of 3 rows and 3 columns
f.setSize(300,300);
f.setVisible(true);
}
public static void main(String[] args) {
new MyGridLayout();
}
}
(iii)BorderLayout- Components can be placed in the Center, North, South, East,
or West. Useful trick: to place several controls in one of these places, create
a Panel
containing the controls, then place
the Panelin one of the 5 BorderLayout
locations.
The BorderLayout is used to arrange the components in five regions: north,
south, east, west and center. Each region (area) may contain one component
only. It is the default layout of frame or window. The BorderLayout provides
five constants for each region:- public static final int NORTH
- public static final int SOUTH
- public static final int EAST
- public static final int WEST
- public static final int CENTER
Constructors of BorderLayout class:
- BorderLayout(): creates a border layout but with no gaps between the components.
- JBorderLayout(int hgap, int vgap): creates a border layout with the given horizontal and vertical gaps between the components.
Example program on Border Layout
import java.awt.*;
import javax.swing.*;
public class Border {
JFrame f;
Border(){
f=new JFrame();
JButton b1=new JButton("NORTH");;
JButton b2=new JButton("SOUTH");;
JButton b3=new JButton("EAST");;
JButton b4=new JButton("WEST");;
JButton b5=new JButton("CENTER");;
f.add(b1,BorderLayout.NORTH);
f.add(b2,BorderLayout.SOUTH);
f.add(b3,BorderLayout.EAST);
f.add(b4,BorderLayout.WEST);
f.add(b5,BorderLayout.CENTER);
f.setSize(300,300);
f.setVisible(true);
}
public static void main(String[] args) {
new Border();
}
}
Another Example for Border Layout by adding Panel to the Frame
import java.awt.*;
import java.awt.event.*;
public class BorderLayoutExample {
public static void main(String[] args) {
Frame frame= new Frame("BorderLayout Frame");
Panel pa= new Panel();
Button ba1= new Button();
Button ba2=new Button();
Button ba3=new Button();
Button ba4=new Button();
Button ba5=new Button();
frame.add(pa);
pa.setLayout(new BorderLayout());
pa.add(new Button("Wel"), BorderLayout.NORTH);
pa.add(new Button("Come"), BorderLayout.SOUTH);
pa.add(new Button("Rose"), BorderLayout.EAST);
pa.add(new Button("India"), BorderLayout.WEST);
pa.add(new Button("RoseIndia"), BorderLayout.CENTER);
frame.setSize(300,300);
frame.setVisible(true);
frame.addWindowListener(new WindowAdapter(){
public void windowClosing(WindowEvent e){
System.exit(0);
}
});
}
}
import java.awt.*;import java.awt.event.*;public class BorderLayoutExample { public static void main(String[] args) { Frame frame= new Frame("BorderLayout Frame"); Panel pa= new Panel(); Button ba1= new Button(); Button ba2=new Button(); Button ba3=new Button(); Button ba4=new Button(); Button ba5=new Button(); frame.add(pa); pa.setLayout(new BorderLayout()); pa.add(new Button("Wel"), BorderLayout.NORTH); pa.add(new Button("Come"), BorderLayout.SOUTH); pa.add(new Button("Rose"), BorderLayout.EAST); pa.add(new Button("India"), BorderLayout.WEST); pa.add(new Button("RoseIndia"), BorderLayout.CENTER); frame.setSize(300,300); frame.setVisible(true); frame.addWindowListener(new WindowAdapter(){ public void windowClosing(WindowEvent e){ System.exit(0); } }); } }Output this program:àJava Adapter Classes
Java adapter classes provide the
default implementation of listener interfaces. If you inherit the adapter
class, you will not be forced to provide the implementation of all the methods
of listener interfaces. So it saves code.
The adapter classes are found in java.awt.event,
java.awt.dnd and javax.swing.event packages. The Adapter classes
with their corresponding listener interfaces are given below.
java.awt.event
Adapter classes
Adapter class
|
Listener
interface
|
WindowAdapter
|
WindowListener
|
KeyAdapter
|
KeyListener
|
MouseAdapter
|
MouseListener
|
MouseMotionAdapter
|
MouseMotionListener
|
FocusAdapter
|
FocusListener
|
ComponentAdapter
|
ComponentListener
|
ContainerAdapter
|
ContainerListener
|
HierarchyBoundsAdapter
|
HierarchyBoundsListener
|
Example
import java.awt.*;
import java.awt.event.*;
public class MouseAda extends MouseAdapter{
Frame f;
MouseAda (){
f=new Frame("Mouse Adapter");
f.addMouseListener(this);
f.setSize(300,300);
f.setLayout(null);
f.setVisible(true);
}
public void mouseClicked(MouseEvent e) {
Graphics g=f.getGraphics();
g.setColor(Color.BLUE);
g.fillOval(e.getX(),e.getY(),30,30);
}
public static void main(String[] args) {
new MouseAda ();
} }
|
Files
File is nothing but collection of records related to DBMS
In programming language, file concept is an approach in
storing data in a secondary memory in the form of file
Operations on files
1. Read op
2. write op
3. Append op
4. Read/Write OP
In java file concept is using Stream Readers
FileInputStream reader
FileOutputStream reader
FileInputStream reader:
we can read the data from a file and display it on the console, If file exist
FileOutputStream reader:
using this we create a new file and store data on to a file, which is entered from the keyboard
To Create a File and store data in a File
import java.io.*;class crateFile
{
public static void main(String args[])throws IOException
{
DataInputStream dis=new DataInputStream(System.in);
FileOutputStream fout=new FileOutputStream("h2.txt");
System.out.println("Enter text @ at the end");
char ch;
while((ch=(char)dis.read())!='@')
fout.write(ch);
fout.close();
}
}
To read data from a File and display on to the console
import java.io.*;
class readfile
{
public static void main(String[] args) throws IOException
{
int ch;
FileReader fr=null;
try
{
fr=new FileReader("h1.txt");
}
catch (FileNotFoundException fe)
{
System.out.println("File not found");
return;
}
while ((ch=fr.read())!=-1)
System.out.print((char)ch);
fr.close();
}
}
daily updating the blog ya
ReplyDelete